Technique - An attempt to fix a Weller WD 1 soldering power unit
An attempt? Yes. To spoil the fun: this was not a succesful fix by just replacing a part inside. Instead I had to swap PCB's (and a transformer) to get the result I was after.
The need for a smaller soldering iron
 As I grew into scratchbuilding, more and more times I was working with SMD LEDs. The more I did, the more I wished for a soldering iron more suited for those parts. The fine tip for my Weller WTCP iron was still not well suited for a 0603 SMD LED and with the wish to advance with 0402 style LEDs, that was asking for trouble.
The great disadvantage of a WTCP style iron is the magnetic field around the tip which makes the magnetic SMD LEDs fly towards it on a voluntary basis. On the hunt for something better!
Via the Circuitsonline electronics-forum, I knew the brands JBC and Pace. I read good stories about soldering equipment from those brands, but acquiring them was a problem. If I didn't want to rely solely on internet-purchases, I had to look for something else. I had new professional experience with a more fine iron from Weller, so that brand was in favour.
A second hand Weller WD 1 with WSP80 iron
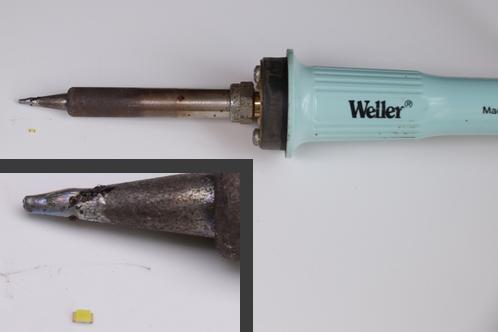
 Via the Circuitsonline electronics-forum, I bought a second-hand Weller WD 1 power unit with a WSP 80 iron including the safety rest and 3 small tips. The tips of this iron are far smaller and without a magnetic field, I don't have to worry about LEDs flying to the iron before I asked them to.
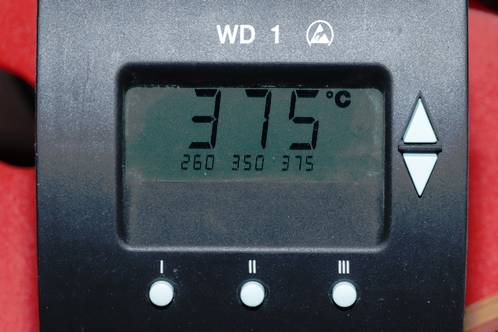
Things went bad when I placed it on my table and tried to use it for something small. After switch on, some digits of the LCD screen remained blank and as much as I tried, that didn't change.
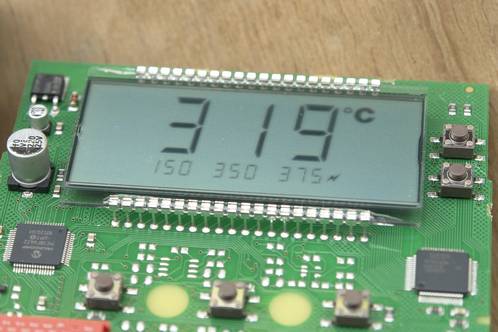
What made this annoying was the fact that the missing digits provided a false temperature reading. When setting 375 degrees Celsius, the screen would display 315 degrees and also some other settings were not readible anymore. The picture shows the station at 379 degrees, while the display only reads 319.
Let's open it up!
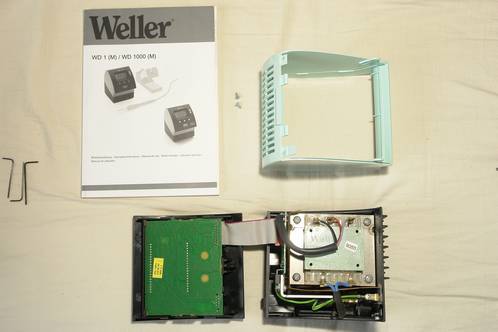 Fortunately, opening this unit is not such a hassle as opening a WTCP-S (or comparable) station, where everything is clicked into place. With the WD 1 (and most likely all the other versions) some screws and latches you can easily reach, take care of everything.
To rule out bad connections somewhere on the PCB, I decided to turn the unit on and, while so, solder all the connections to the LCD. If there was a bad contact somewhere, the heat would hopefully locate it by causing a connection agan. Unfortunately, that didn't work.
I then tried to warm up the 'clamps' where the pins of the LCD meet the glass, to hopefully locate a possible problem there. Sadly, to no avail again.
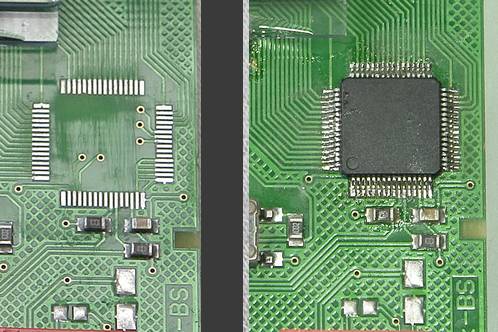
 Carefully examining the PCB, I had an eye out for semiconductors.
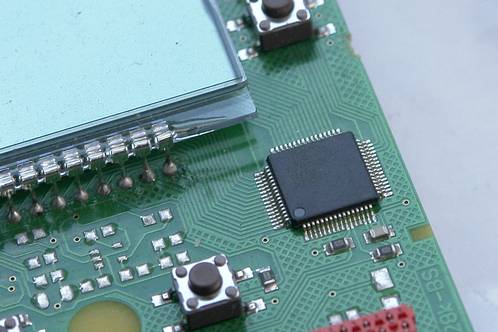
I found a PIC-microcontroller and tracing back from the LCD, a PCF8576, an LCD-driver.
That's an IC in LQFP-case, with 64 legs, not quite my favourite type of case to replace, especially because I had never done that.
Slightly discouraged, I decided to look for a complete replacement-PCB. It was next to impossible to find one and when I did, I was greatly discouraged. With a price of about 200 Euro excluding VAT I decided to spend a few Euro on a PCF first. I could always buy a PCB if my attempt would fail.
A new IC was bought at Farnell. After unpacking, I looked at it in awe. That was quite the package with so many pins...
Desoldering PCF8576 and placing a new one
 With my regular soldering iron, I dragged a lot of tin along the legs of the IC and tried to heat this as quickly as possible, until I could slide the IC from the PCB.
With solder-wick I carefully cleaned all the pads, to prepare them for the new IC.
Aligning the new PCF was done by first soldering 1 pin in one of the corners and then check for alignment. This way, you can easily correct any mistakes.
When alignment proved OK, I soldered another pin in a corner diagonally opposite. With solderpaste and some flux, the IC was completely soldered with my hot-air station.
Soldering this kind of packages does demand some practice, as I had some solder-bridges between pins and pads. Solder-wick took care of that and after some extra cleaning, I was quite pleased with the result.
No solution...
Unfortunately, replacing this IC did not solve the issue. The LCD still had some blank digits. Big chance that the problem lies in the LCD itself, something I can't fix (how unfortunate that may be).
At least I gained some experience with LQFP packages and I did not discard off the device straight away.
A few switch-on and -off's, to see if that would change anything (you never know), did not work as well.
On the contrary: after 3 times or so, the problem got even worse, when the screen went blank completely.
At that point I put this unit aside and started to look for a replacement.
Expensive PCB... a new power unit?
Because a substitute PCB was so expensive it was hardly the trouble, I decided to look for a new power unit. With something like 300 euro (excluding VAT), that wasn't cheap either. On Marktplaats.nl, a Dutch site where people can sell their second-hand goods, I could not find anything, only new ones, no second-hand units.
That's why I turned to Ebay. I could only find types from the US. If I did find a European seller, the unit usually was expensive or defective.
One from the US then. The difference in voltage is not a problem as I knew the transformer from mine was fine, so I could transfer that one without any problem. The rest is identical and should work.
The downside were the costs of the station itself and the price of getting the item across the ocean. The price in total sometimes was so high that I would be cheaper off buying a new station in Europe.
A 'new second-hand'
 Until the end of February 2019. After another search on Ebay, I found a reasonably priced second hand unit, with sensible shipping costs. For 155 euro including shipping and customs charges, I got a 'new' second hand unit from the USA.
Before I would open it up, I tested it. With the variac set to 110 Volt, the LCD lit up completely on switch-on. It works!
Let's open it!
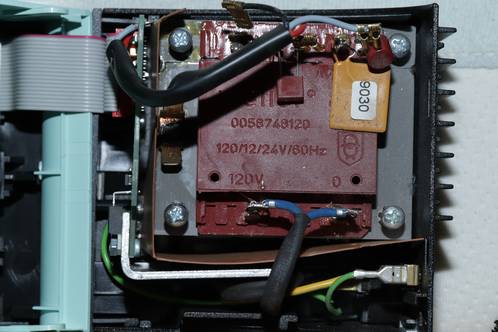
A surprising difference is the amount of extra safety-measures taken at the transformer. I don't know if this comes down to the previous owner messing around inside, but the two extra fuses and thermistor or varistor on the secondary connections, sure stand out. The European model doesn't have those.
 What should have been a swift replacement of just the transformer, ended up being a complete swap of nearly everything. The case of the US-model proved to have quite some wear and tear to it.
The mainswitch and the front around it featured numerous small holes, like someone had poked it with a soldering iron multiple times and around the LCD, a number of scratches could be found.
That's why I swapped the LCD and power-board from the US model to mine. This way I had a case that was in mint condition, with working PCB's and the right transformer inside.
After mounting everything together, this was the result: it was working again!